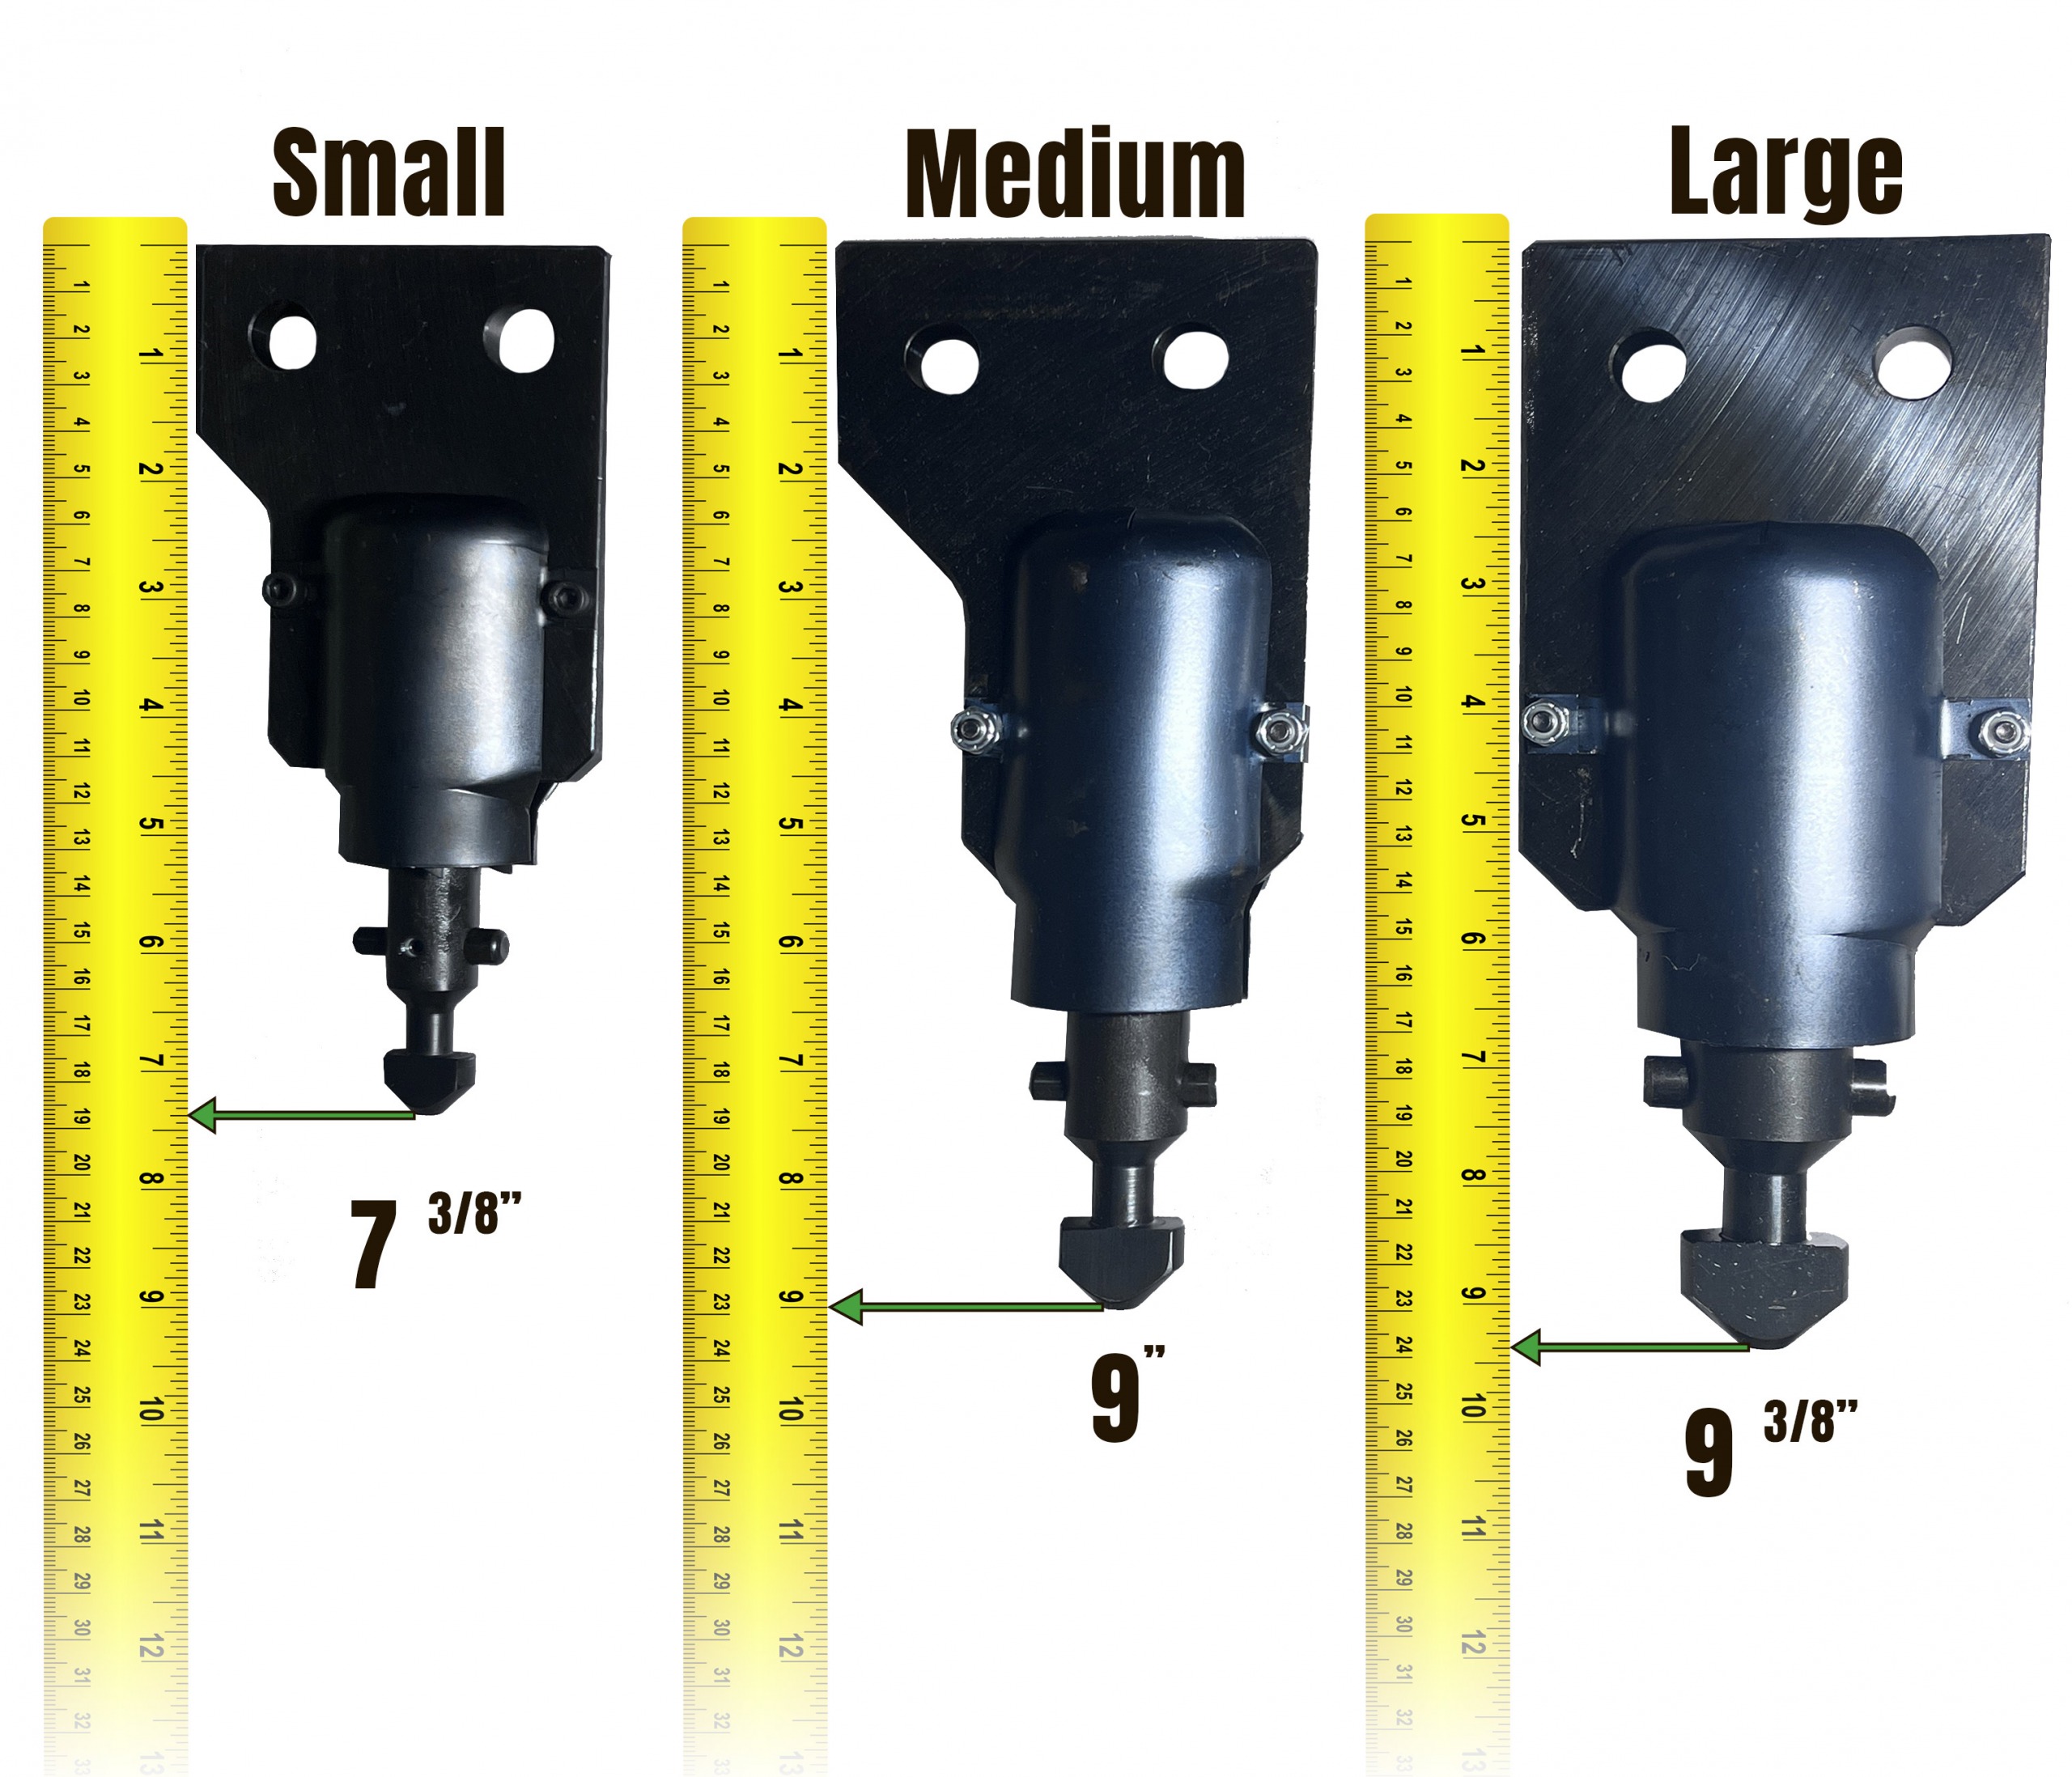
What Size Actuator Do I Have?

Refer to this blog post for details about the actuator. Or simply use the measurements below to compare its size when shaft is fully extended.

kenco actuator side by side size comparison with tape measure


What is the Return Policy?

Returns*

Unused Items:

You have 30 calendar days from the time of receiving your Kenco product to return it. Kenco will only issue a full refund of the product purchase price less shipping if the item received:

  • is not what the customer had originally ordered
  • is in its original packaging
  • has not been used

Used Items: 

Lifting attachments that are being returned must be inspected by Kenco before a refund can be issued. The customer must contact Kenco before sending the lifter by phone – 800-653-6069 – or by email – sales@kenco.com. A sales representative will notify engineering that the lifter is being returned. Upon receiving the lifter, a Kenco engineer will conduct a complete evaluation and determine if there are any damages. These repairs along with a 15% restocking fee will be deducted from the purchase price of the lifter.

Pads and actuators are considered wear items and therefore cannot be returned after any use.

Refunds*

If the return is approved, the product price less any above-mentioned fees will be returned by the same payment method as received within 5-10 calendar days.

International charges such as duties or  insurance will not be refunded.

Shipping fees are also non-refundable.

Payment Methods & Terms

Major credit cards accepted and processed through a secure channel – Solupay. A copy of receipt and paid invoice will be emailed to the customer after the item has been fulfilled. Any billing issues can be directed to accounting@kenco.com. Please see our Privacy Notice for further details on our policy on sharing your personal information.

Shipping

All lifting attachments will be shipped using FedEx Freight unless otherwise specified. The tracking number will be located in the upper right hand corner of the invoice. Customer wanting to use their own freight company or to use 3rd party billing must contact Kenco by phone – 800-653-6069 – to place their order.

Replacement parts will be shipped via FedEx Ground, 2nd day or overnight services as specified by customer at checkout.

Shipping fees are non-refundable and the customer’s responsibility unless the shipping error was made by Kenco. Return shipping/freight is the sole responsibility of the customer.

Warranty 

All lifters are to be free from proven defects in material and workmanship for a period of six months. See Kenco’s warranty policy located at the end of your lifter’s manual for full details.

Contact Us 

Before sending any item back to Kenco, contact 800-653-6069 or sales@kenco.com.

*Return and refund policy is for standard models only.


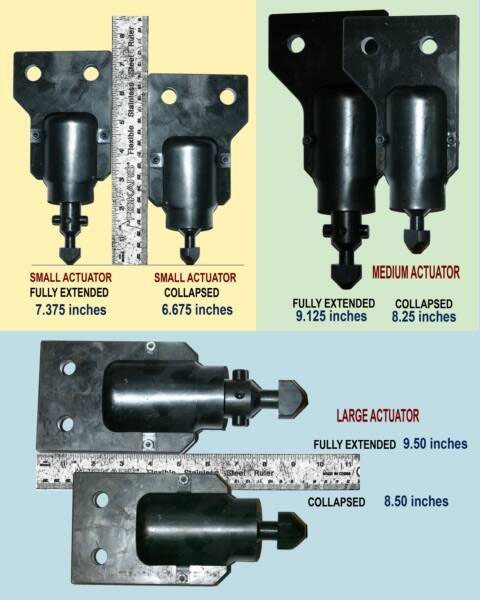
Actuator Size – Which One Do I Have?

kenco actuator dimensions and size

How Much Does the Pipe Lifter Weigh?

  • Pipe Lift Model
  • PL1500
  • PL2000
  • PL2150
  • PL2250
  • PL2500
  • PL2750
  • PL3000
  • PL3500
  • PL4500
  • PL7000
  • PL8500
  • Weight / Shipping Weight (LB)
  • 200
  • 225
  • 240
  • 330
  • 350
  • 410
  • 550
  • 580
  • 1250
  • 1600
  • 1750

Lifter will not release to grab load or will not stay latched open to come off of the load.

Check orientation of arrowhead in receiver block.

Angled arrowhead: means the actuator was forced out of phase into slot causing shaft to twist. Replace actuator.

Straight arrowhead: check lifter for obstruction, over tightened bolts etc. preventing operation.

Multilift: Lifter will not collapse under its own weight after releasing tension.

  1. Check how the lifter is set on the object being lifted
    1. Is the lifter oriented perpendicular to the gripping surfaces?
      1. No
        1. Ensure lifter is oriented as close to perpendicular gripping surfaces as possible.
    2. Are the feet being obstructed?
      1. Yes
        1. Place object in a location where there is enough clearance for the feet to move freely.
  2. Check for proper tightening of bolts.
    1. Are the bolts able to be rotated by hand when lifter is at rest?
      1. No
        1. Loosen bolts until they can rotate by hand.

Multilift: Lifter will not grip object or lifter slips off of object before lifting.

  1. Check proper tooth engagement. 
    1. Are both sets of teeth fully engaged with spines? 
      1. No
        1. Ensure the handles are in the locked position. 
        2. Ensure feet assemblies are on the correct side of the lifter.
      2. Yes
        1. Adjust foot position closer to object to ensure lifter is not running out of stroke before making contact with object.
        2. Ensure all teeth are in good condition and not sheared/rounded off.
  2. Check condition of pads.
    1. Are the urethane surfaces marred and in poor condition?
      1. Yes
        1. Stop using lifter and order a new set of pads
      2. No
        1. Ensure both contacting surfaces are free from contamination ie. dirt, grease and gravel
  3. Check how the lifter is set on the object being lifted
    1. Are the gripping surfaces able to fully contact each other?
      1. No
        1. Reset lifter onto object above the center of gravity while ensuring the lifter lays flat. 
        2. Add shims under lifter in strategic positions which would result in a secure lift and full pad engagement. 
        3. Call Kenco at 1-800-653-6069 to order optional extended/customized feet and/or bolt-on standoffs.

When should I have device recertified? Yearly, semi anually?

Your Kenco lifter should be removed from service until re-certification by a qualified in if it does not pass any of the Inspection Criteria in the manual. Examples include visible distortion is any bolt/shaft/pin/member; cracking in any weld/component/member; 20% loss in cross-sectional area from original member in the lift bail; 10% loss in cross-sectional area from the original member in relation to intended holes (such as bolt holes). *typically found near page 8 in the barrier lift manual

You should be performing daily inspections if using daily and prior to starting any new job if the lifter has been sitting. This includes checking pad wear, snugness of bolts, lubrication of actuator (WD-40), free rotation of pad angles. Annually the pivot bolts and washers should be greased, all above inspections in paragraph 1 should be made, remove and clean with lubricating oil (NOT grease) the actuator.

If there are ever any concerns about the lifter you are using, we strongly suggest taking pictures and sending to our sales@kenco.com email address along with any and all details you can provide.

Can I replace the rubber lining on my Kenco Pipe Lift?

Yes, you can replace this. It is adhered with a 3M adhesive and we can provide that for you as well, just ask.

Pricing for the rubber kits are as follows.

PL1500 Rubber Liner – $39.50

PL2000 Rubber Liner – $44.50

PL2150 Rubber Liner – $47.00

PL2250 Rubber Liner – $50.00

PL2500 Rubber Liner – $55.50

PL2750 Rubber Liner – $78.50

PL3000 Rubber Liner – $86.00

PL3500 Rubber Liner – $133.75

PL4500 Rubber Liner – $169.50

What is the DAILY proper maintenance of my Kenco Barrier Lift?

In order to catch any issue quickly, we recommend doing a quick check on your lifter at the start of each work day it will be used. Perform the following:

  1. Visually inspect Kenco Barrier Lift for signs of stress and wear.
  2. Check that bolts and nuts are snug.
  3. Ensure free movement of all components.
  4. Ensure that all warning labels are present and readable. (New sticker kits are available for purchase – sales@kenco.com)
  5. Check that the actuator mounting screws are snug and seated. *top two bolts found on the mounting plate above the actuator
  6. Lubricate all moving mechanisms with penetrating oil. DO NOT USE GREASE.
  7. Lubricate actuator with penetrating oil (ex. WD-40). NEVER use anything other than a light penetrating oil on the actuator. Grease will cause the actuator to gum up and will cause it to not operate properly. Grease also attracts ducts and particles which causes the actuator to not move smoothly.

Pads (also at start of the work day)

  1. Check that all pad mounting bolts and nuts are tight.
  2. Verify freedom of rotations for the pad angles.
  3. Ensure that the pad material is sound, and not de-laminated from backing plates.
  4. Ensure that pad mounting bolt heads are a minimum of 3/32″ below the surface of the pad. *see below
  5. Ensure pad surfaces are clean and free of any foreign substance or material.